Author: Ian McLauchlan
-
Ian McLauchlan’s Guide To Making A Headjoint: Finishing the Headjoint
Probably the most important stage of making a headjoint is cutting the embouchure hole. It is this that really makes it work or not.
-
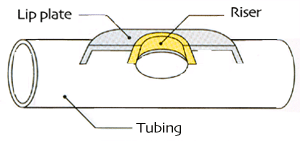
Ian McLauchlan’s Guide To Making A Headjoint: The Riser
In my first two articles in this series I talked about how I make a headjoint tube and lip-plate. This article covers the riser: a part that you don’t really see but that is an important part of the headjoint. The riser (also called the chimney, or by some American flutemakers, the ‘wall’) gives the…
-
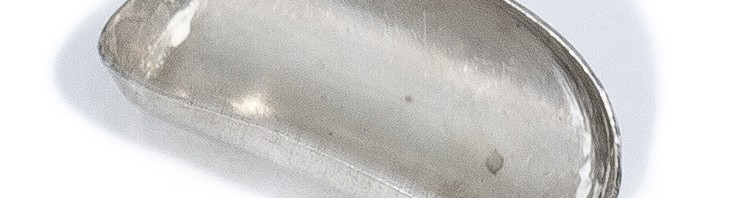
Ian McLauchlan’s Guide To Making A Headjoint: The Lip-Plate
In part 1 of this guide, I explained how tubes for handmade flute headjoints are made. In this article, I’ll talk about the method I use to make a lip-plate.
-
Ian McLauchlan’s Guide to Making A Headjoint
What I am intending to do over my next few blog posts is to describe the process involved in producing a headjoint from tubes and sheet, through to the final finished product. I am not for one moment suggesting that this is the only way of making a headjoint, but it is one that works…
-

Sticky Pads: A Perennial Problem
Sticky flute pads are something that nearly all flute players have to put up with. Here are some tips on how to reduce stickiness and noise.
-
Open G#: To open, or not to open?
If you look at your flute, you will find that all the keys are sprung open except for D#, G# and the trill keys. The reason for this is that Theobald Boehm, the inventor of the mechanism on the modern flute, designed the keywork on the principle that all the keys should be open, and…
-
Headjoints: A Guide to Choosing
The headjoint of the flute is probably the most ‘personal’ part of the instrument. A headjoint that plays well for one person may be another player’s idea of hell! For this reason, no hard and fast rules can be given as to what makes the “best” headjoint, but a few guidelines may be useful.