In part 1 of this guide, I explained how tubes for handmade flute headjoints are made. In this article, I’ll talk about the method I use to make a lip-plate.
Making up lip-plates for flute headjoints is great fun because the intitial stages involve just brute force!

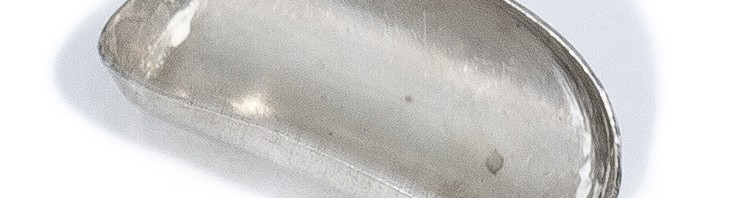
The photograph above shows the three necessary tools for starting to shape a lip-plate. The steel former on the left is a punch which is shaped like the underside of a lip-plate, and it is on this that all the work takes place. The larger round item in the centre is a lead mould which has the impression of the punch in it. The third necessary tool is a nylon mallet.
The first stage of making the lip is to cut out, from a sheet of silver, an ellipse the shape of a flattened out lip-plate:

Position this carefully over the lead mould and place the punch on top. Now, take a large weighted hammer and, preferably in one strike, sink the punch firmly down into the mould. This squeezes the silver sheet between the two, producing a rough – but recognisable – lip-plate.

Now, on the over-hang around the edge of the lip-plate, it usually looks as if it has been cut with pinking shears! This is obviously not acceptable to flute players, so to get rid of this, hold the steel former in a strong vice. Sit the lip-plate on it, and tap gently around the overhang with a very hard steel hammer until it is tight on the punch and hey presto – one lip-plate! Well… not quite.
This overhang now has delicate hammer marks all over and it may not be symmetrical. Lip-plates look much better with a sharp angle , so the overhang is tidied up using a file which, with care, gives it a clean surface. This is then polished to a mirror finish.
Finally the surface of the lip-plate is made absolutely flat using a file which is run lengthwise over the whole surface of the lip-plate, all while it is sitting in the punch. This surface is then polished to a mirror finish.

In my next article, I’ll discuss how I add the riser.
This article was originally written by Ian McLauchlan for Flutewise.