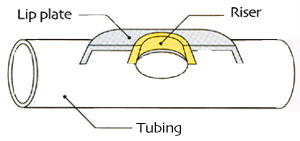
In my first two articles in this series I talked about how I make a headjoint tube and lip-plate. This article covers the riser: a part that you don’t really see but that is an important part of the headjoint.
 The riser (also called the chimney, or by some American flutemakers, the ‘wall’) gives the embouchure hole its depth. This depth affects the response and tone quality of the headjoint, broadly a deeper chimney produces more low harmonics in the sound and therefore a richer quality. A shallow chimney will produce a brighter and freer-blowing headjoint.
The riser is shaped like a top hat without a top, and most headjoint makers use a casting to make it. By creating one riser the correct shape and making a mould from it, any number of copies can be made in any metal, the most popular being silver, gold and platinum.
The riser is soldered firmly to the underside of the lip-plate. To hold the riser and lip-plate in the correct position whilst they are heated up, I use a simple arrangement of two U-shaped metal clips. I do the soldering on an old house-brick, as it won’t burn and it retains heat easily: this means that the lip-plate also heats up from underneath, which helps the solder run all the way around the joint.
Next, the lip-plate and riser are cleaned up and soldered on to the headjoint tube. Here I use two pieces of thin wire twisted around everything to hold it all together.
After soldering is complete, the headjoint is now ready to have the embouchure hole ‘cut’. This is the critical stage in making the headjoint, as it is this that ultimately makes it good or bad!
The next article will cover this cutting and final polishing and finishing of the headjoint.
This article was originally written by Ian McLauchlan for Flutewise.

